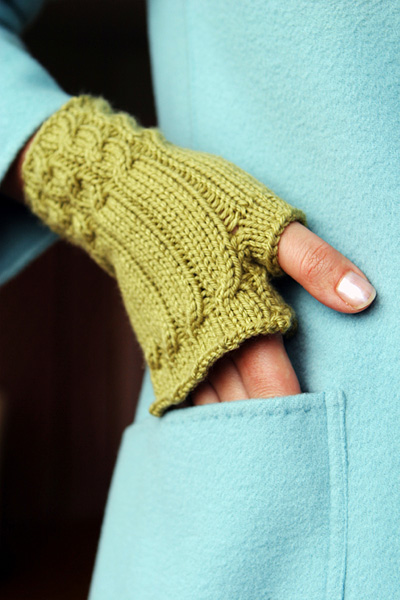
اجعلى يديكى دافئة مع الجوانتيات التريكو بالباترون
SIZE
one
FINISHED MEASUREMENTS
Cuff circumference: 7 inches (unstretched)
Length: 6.25 inches
MATERIALS
Debbie Bliss Cashmerino Aran [55% Merino Wool, 33% Microfibre, 12% Cashmere; Approx. 98yd/89m per 50g ball]; Shown in Olive 501 and Black 300; 1-2 balls [many knitters have completed a pair with just one ball, but every knitter is different. Buy two, and if you don't need both for your first pair, make a second.]
1 set of US #6/4mm double-point needles
Safety pin or split ring marker
Cable needle (a double-point needle may be used if you have a set of 5; only 4 are used for this project)
Approx. 12 inches smooth waste yarn in a contrasting color (mercerized cotton works well)
Tapestry needle
GAUGE
21 sts / 30 rows = 4 inches in stockinette stitch
Note: Yarn is worked more tightly than recommended gauge to produce a firm fabric.
PATTERN NOTES
[Knitty's list of standard abbreviations and techniques can be found here]
C4B: Slip next 2 sts to cable needle (or spare double-point needle) and hold to back of work; k2, k2 from cable needle.
C4F: Slip next 2 sts to cable needle (or spare double-point needle) and hold to front of work; k2, k2 from cable needle.
4x1 Rib (Worked in the round over a multiple of 5 sts):
Round 1: [K4, p1] to end.
Repeat this round for 4x1 Rib.
Instructions for Cable Cast On can be found here.
DIRECTIONS
Left Hand
CO 45 sts. Divide between needles, placing 15 sts on each needle. Join to begin working in the round, being careful not to twist. After first round, place safety pin or split ring marker in work to indicate beginning of round.
Work 4 rounds in 4x1 Rib.
Cable Round: [C4B, p1] to end.
Work 5 rounds in 4x1 Rib.
Work Cable Round.
Repeat these 6 rounds once more.
Work 18 rounds in 4x1 Rib.
Next Round: Using waste yarn, k7; slip these sts back to left needle and k them again using working yarn; work in 4x1 Rib as set to end.
Work 4 more rounds in 4x1 Rib.
Work Cable Round.
Work 4 more rounds in 4x1 Rib.
Picot Bind Off
BO 5 sts, [slip st on right needle back to left needle; CO 1 st using Cable Cast On method, BO 6 sts] until all sts have been bound off, slip st on right needle back to left needle; CO 1 st using Cable Cast On method, BO remaining st.
Break yarn and draw through last st. Thread yarn tail on tapestry needle and sew yarn tail to beginning of BO round. Weave in end.
Thumb
Carefully remove waste yarn and place resulting live sts on two double-point needles; there will be 7 sts below the opening and 6 sts above. Attach yarn and k the 7 sts on lower needle; using a second needle, pick up and k 2 sts in space between upper and lower needle, k first 3 sts from upper needle; using a third needle, k remaining 3 sts from upper needle and pick up and k 2 sts in space between this needle and lower needle. 17 sts.
K 4 rounds. BO loosely (so you don't cut off the circulation in your thumbs when you're wearing the gloves!).
Weave in ends.
Right Hand
Work as for Left Hand, EXCEPT work Cable Round as follows:
Cable Round: [C4F, p1] to end.
This way, the cables on each hand will twist fetchingly toward your thumbs.
FINISHING
Steam block lightly if desire
...................................................................................................................................................
.........................................................................................................................................................................................................................
SIZE
IZE
One size fits hands with circumference measurements from 7 inches to 9 inches. Ribbing makes this pattern very stretchy.
Print With Images Print Without Images
FINISHED MEASUREMENTS
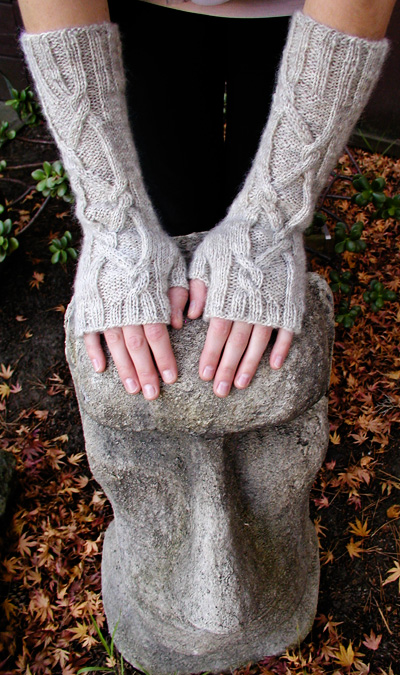
Hand Circumference: 6.5 inches
Length from cast-on to bind-off: 12 inches
spacer
MATERIALS
Fiber:
Pattern version [shown above]
spacer Tawanda Farms Romney wool [pin-drafted roving]; natural grey; 3 ounces.
Finished Yarn:
spacer Wraps per inch: 14
spacer Ply: 2
spacer Yardage used: 200
gearbox
Spinning Tool: Schacht Ladybug; scotch tension
Lazy Kate: Schacht arched lazy kate
Drafting Method:
spacer Long-draw
Commercial Yarn Alternative
spacer Brown Sheep Nature Spun Sport [100% wool; 184 yd/169 m per 50g skein]; color: Ash; 2 skeins
Recommended needle size
[always use a needle size that gives you the gauge listed below -- every knitter's gauge is unique]
spacer US #4/3.5 mm needles for working in the round: DPNs, 1 long circular or 2 short circulars
Tools
spacer waste yarn
spacer yarn needle
spacer 7 stitch markers (2 each of 3 different styles or colors plus one for the start of round)
spacer cable needle
GAUGE
24 sts/32 rounds = 4 inches in stockinette stitch
30 sts/32 rounds = 4 inches in cable pattern
PATTERN NOTES
[Knitty's list of standard abbreviations and techniques can be found here.]
LLinc: Insert the left needle tip from back to front into the stitch two stitches below the first stitch on the right needle. Knit this stitch through the back loop.
RLinc: Insert the right needle tip from front to back into the stitch below the next stitch on the left needle, and knit into it, being careful not to slip the next stitch off the left needle.
Lifted increase informaiton can be found here and here.
Twisted German Cast-on: See this video by Lucy Neatby for a good tutorial.
Backwards loop Cast-on: See this page for information.
For shorter mitts, work only chart rows 1-16
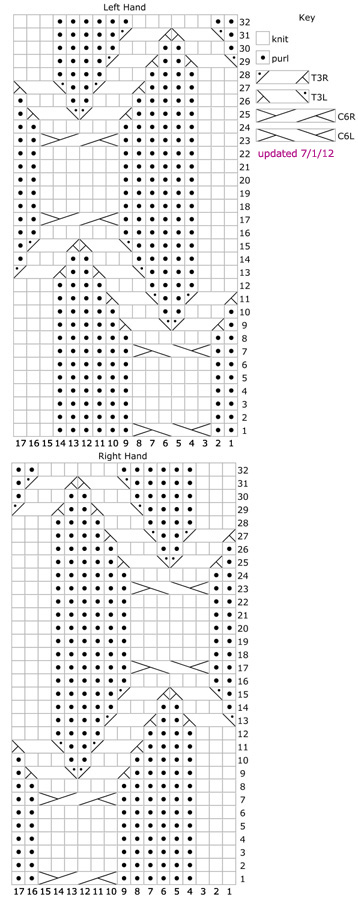
Charts
The charts for this pattern are very large and fit on a letter-sized page.
Click here and print the resulting page.
C6R: Slip next 3 sts to cable needle and hold at back of work; k3, then k3 from cable needle.
C6L: Slip next 3 sts to cable needle and hold at front of work; k3, then k3 from cable needle.
T3R: Slip next st to cable needle and hold at back of work; k3, then p1 from cable needle.
T3L: Slip next 3 sts to cable needle and hold at front of work; p1, then k3 from cable needle.
DIRECTIONS
spacerCuff
Cast on 48 stitches using your favorite stretchy cast-on (I used the Twisted German cast-on), distribute across needles as you prefer and join to work in the round. Place marker if required for start of round.
Ribbing round: [K2, p2] around.
Work Ribbing round until the cuff measures 2.5 inches from cast on edge.
Left mitt, pattern setup round: K2, place marker for start of cable pattern, work row 1 of Left Hand Chart, place marker for end of cable pattern, k11, place marker for start of ribbing, (p1, k1) 4 times, p1, place marker for end of ribbing, k9.
Right mitt, pattern setup round: K3, place marker for start of cable pattern, work row 1 of Right Hand Chart, place marker for end of cable pattern, k11, place marker for start of ribbing, (p1, k1) 4 times, p1, place marker for end of ribbing, k8.
This sets up cable patterns on back of hand and ribbing for palm.
Work in pattern as set until 32 rows of chart are complete; continue until row 15 of a second repeat is complete.
spacerThumb marker setup, Left mitt: Work in pattern as set to end of ribbing, k4, place 2 markers, work to end of round as set.
Thumb marker setup, Right mitt: Work in pattern as set to end of cable pattern, k7, place 2 markers, work to end of round as set.
Gusset round 1: Work in pattern as set to first of two thumb markers, sl m, LLinc, RLinc, slip marker, work to end of round as set.
Gusset round 2: Work even in pattern as set.
Gusset round 3: Work in pattern as set to first of two thumb markers, sl m, LLinc, k to second thumb marker, RLinc, slip marker, work to end of round as set.
Gusset round 4: Work even in pattern as set.
Repeat Gussets rounds 3 & 4 5 more times. 14 sts between markers, chart row 30 complete.
Divide thumb sts: Work in pattern as set to first thumb marker, remove thumb marker, slip 14 thumb sts to waste yarn, CO 2 sts using backwards loop method, placing a marker between the 2 sts, remove second thumb marker, work to end of round as set.
Next round: Work in pattern as set to 2 st before center of thumb marker, SSK, remove marker, k2tog, work to end of round as set.
Work 8 more rounds in pattern as set. Chart row 8 complete.
Ribbing round: [K2, p2] around.
Work 5 more rounds as set. Bind off loosely in pattern.
Thumb
Return the 14 held stitches back on the needles. With RS facing, rejoin yarn, and pick up and knit 2 stitches over the CO sts, distribute sts as you prefer, and join to knit in the round. 16 sts.
Ribbing round: [P2, k2] around.
Work 5 more rounds as set. Bind off loosely in pattern.
FINISHING
Weave in ends, using yarn tails to close any holes in the thumb. Block.
spacer