http://www.ravelry.com/patterns/library ... legwarmers
-------------------------------------------------------------------------------------------------------------------------------------
 http://www.knitty.com/ISSUEspring08/PATTmosey.html
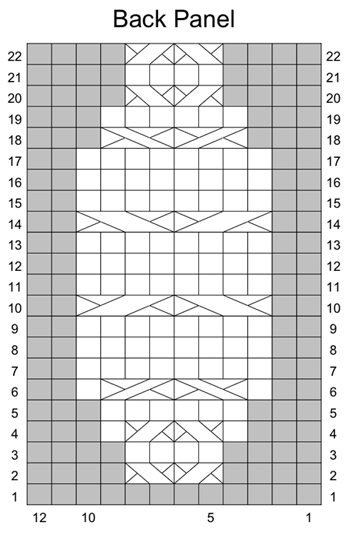
SIZE
To fit calf circumference up to 16[22] inches (16-inch shown)
FINISHED MEASUREMENTS
Circumference of ribbed cuff, unstretched: 10[12] inches
Circumference of cabled legwarmer: 16[22] inches
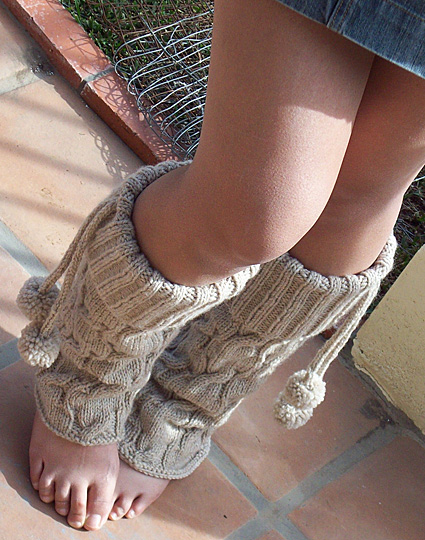
Length of legwarmer with cuff folded: 15.5 inches
MATERIALS
Patons Classic Wool Merino [100% pure new wool; 223yd/204m per 100g skein]; color: Natural Mix; 3[4] skeins
Recommended needle size:
16-inch US #7/4.5mm circular needle
OR
1 set US #7/4.5mm double-point needles
[always use a needle size that gives you the gauge listed below -- every knitter's gauge is unique]
Stitch markers
Cable needle
Tapestry needle
1.5 inch pom pom maker or cardboard (see Pattern Notes)
GAUGE
20 sts/26 rows = 4 inches in stockinette st
PATTERN NOTES
[Knitty's list of standard abbreviations and techniques can be found here]
If a pom pom maker is not available, directions for making a pom pom using cardboard can be found here
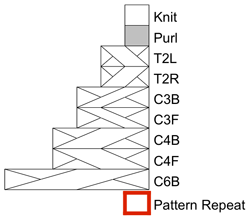
T2L: Knit into back of second stitch on left needle, knit into front of first stitch on left needle, drop both stitches from left needle.
T2R: K2tog, but do not drop sts from left needle; insert right needle between sts just worked together and k into first st again; drop both sts from left needle.
C3B: Slip next 2 sts to cable needle and hold to back of work; k1, k2 from cable needle.
C3F: Slip next st to cable needle and hold to front of work; k2, k1 from cable needle.
C4B: Slip next 2 sts to cable needle and hold to back of work; k2, k2 from cable needle.
C4F: Slip next 2 sts to cable needle and hold to front of work; k2, k2 from cable needle.
C6B: Slip next 3 sts to cable needle and hold to back of work; k3, k3 from cable needle.
2x2 Rib (Worked in the round over a multiple of 4 sts):
Round 1: [K2, p2] to end.
Repeat this round for 2x2 Rib.
Back Panel (Worked over 12 sts):
Round 1: P12.
Round 2: P4, T2R, T2L, p4.
Round 3: P4, k4, p4.
Round 4: P3, k1, T2L, T2R, k1, p3.
Round 5: P3, k6, p3.
Round 6: P2, k1, C3F, C3B, k1, p2.
Rounds 7-9: P2, k8, p2.
Round 10: P2, C4F, C4B, p2.
Rounds 11-13: P2, k8, p2.
Round 14: P2, C4B, C4F, p2.
Rounds 15-17: P2, k8, p2.
Round 18: P3, C3B, C3F, p3.
Round 19: P3, k6, p3.
Round 20: P4, T2R, T2L, p4.
Round 21: P4, k4, p4.
Round 22: P4, T2L, T2R, p4.
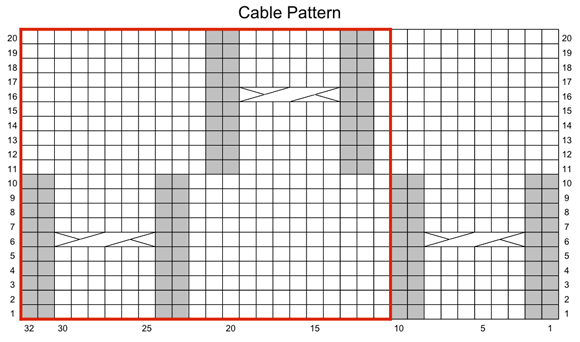
Cable Pattern
(Worked over a multiple of 22 sts + 10):
Rounds 1-5: P2, k6, p2, [k12, p2, k6, p2] to end.
Round 6: P2, C6B, p2, [k12, p2 C6B, p2] to end.
Rounds 7-10: Work as for Rounds 1-5.
Round 11-15: K10, [k1, p2, k6, p2, k11] to end.
Round 16: K10, [k1, p2, C6B, p2, k11] to end.
Rounds 17-20: Work as for Rounds 11-15.
I-cord:
When working I-cord, work is not turned. Instead of turning the work around to work back on the WS, slide all sts to the other end of the needle, switch the needle back to your left hand, bring the yarn around the back of the work, and start knitting the sts again. After the first 2 sts, give the yarn a sharp tug.
Repeat this row to form I-cord. After a few rows, the work will begin to form a tube.
------------------------------------------------------------------------------------------------------------------------------
كروشيه للاطفال
 http://www.domesticblisssquared.com/201 ... ttern.html
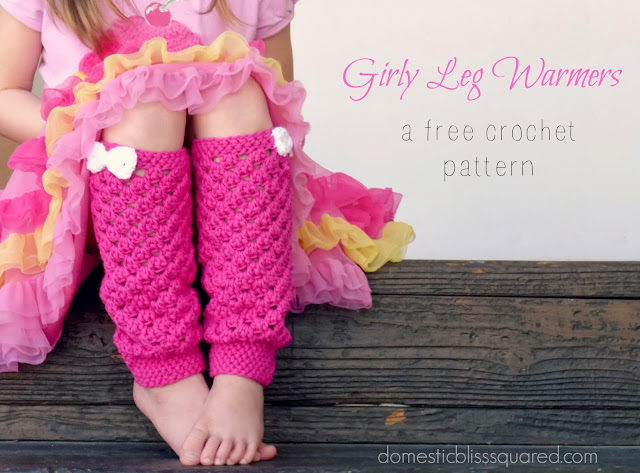
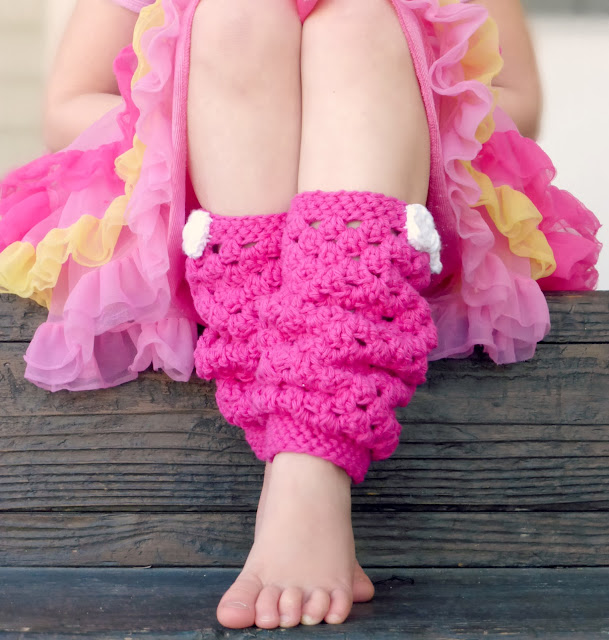
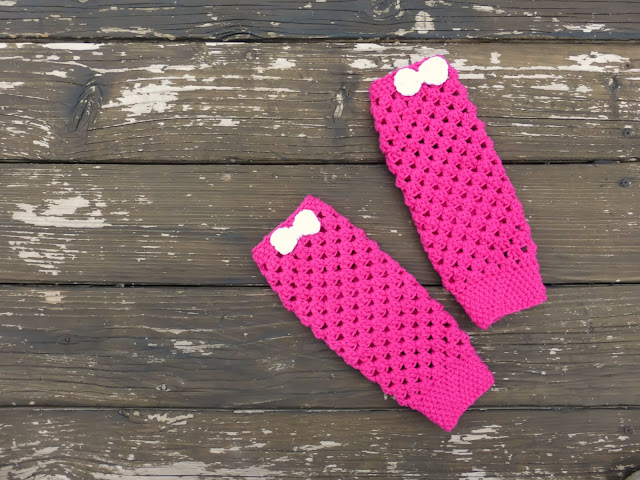
Girly Leg Warmers (pattern as written is for a size 5-7 year old girl)
You will need:
H hook
worsted weight yarn (I used 1 1/2 skeins of Lily Sugar 'n' Cream yarn in hot pink and a tiny amount of white)
Key
Ch: Chain
Sc: Single Crochet
Dc: Double Crochet
St: Stitch
Join st: Join stitch, the slip stitch used to join two ends of a round of crochet stitches
Cluster: For this pattern, a "cluster" is a group of three double crochet stitches all with the same base (base = a single crochet stitch, or the space between clusters)
In addition, this pattern uses a basic granny stitch in rows instead of squares. If you'd like an amazing picture tutorial on how to do this stitch, check out this tutorial for how to do a granny stitch in a straight line from Dream a Little Bigger.
Leg Warmers:
Row 1: Ch 30 (or as many as you need to fit around the leg, in multiples of 3) sl st to join into a circle.
Row 2-4: Sc into your join st, then sc all the way around, sl st to join. (3 rows of sc total)
Row 5: ch 3. 2 dc into join st. skip 2 st, 3 dc into next st, continue until you have gone all the way around your circle. If you started with a ch of 30, you will have 10 clusters of 3 dc st. sl st into your 3ed ch 3 of your first cluster to join.
Rows 6-27: ch 3. 2 dc into the space under your join st. skip 2 st, 3 dc into the space between the next two clusters or your previous row. Sl st into your 3ed ch 3 of your first cluster to join. (21 total rows of clusters**)
Row 28: sc into your join. Sc all the way around, into the tops of each of your dc clusters. You should still have the same number of st as your original ch row (in this case, 30). Sl st into your first sc to join.
Rows 29-36: Sc around, sl st to join. (8 rows of sc). Weave in ends to finish.
** if you are making a bigger or smaller version of this pattern, you may want to make more or fewer rows of clusters.
Bow:
Row 1: ch 8, turn.
Row 2: in 2ed st from hook, begin hdc. 6 total hdc. Ch 2, turn.
Row 3: In 2ed st from hook, begin hdc. Hdc 6.
At the end of your last row, begin to sc all the way around, and once you've made it all the way around sl st to join. leave an 8 inch tail. Use the tail to wrap several times around the middle of your rectangle, the use the rest of the tail to sew the bows to the tops of your leg warmers using a yarn needle.
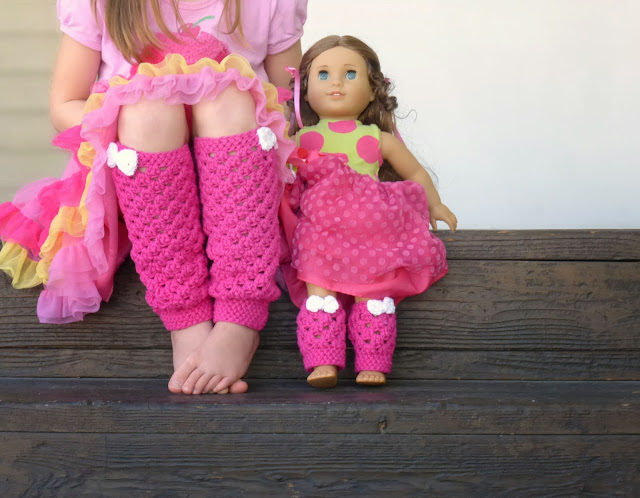
Now you know her new doll also needed a matching pair. Because why not? I had another 1/2 skein of yarn and it was just sitting there, needing to be used!
How precious are those itty bitty bows on the teensy doll leg warmers? I die! If you would like to make your little girl's dolly a matching pair, here is the pattern:
Doll Sized Girly Leg Warmers Pattern
18 Inch Doll Leg Warmers:
Row 1: Ch 18, sl st to join.
Row 2: Sc into join, then sc all the way around. Sl st into your first sc to join.
Row 3: Ch 3. 2 dc into join st. skip 2 st, 3 dc into next st, continue until you have gone all the way around your circle. Sl st into your 3ed ch 3 of your first cluster to join.
Rows 4-7: ch 3. 2 dc into the space under your join st. skip 2 st, 3 dc into the space between the next two clusters of your previous row. Sl st into your 3ed ch 3 of your first cluster to join.
Row 8: Sc into your join. Sc all the way around, into the tops of each of your dc clusters. You should still have the same number of st as your original ch row. Sl st into your first sc to join.
Rows 9-11: Sc around, sl st to join. Weave in ends to finish.
Doll Bows:
Row 1: sc 7. Ch 1, turn
Rows 2-4: In 2ed st from hook, begin sc. Sc 5, ch 1, turn.
Leave a long tail, and use the tail to cinch the middle of your tiny rectangle together. Wrap the yarn around the center of your rectangle about three times, then use the rest of the tail to "sew" your bows to the tops of your doll leg warmers with a yarn needle.
I hope you all truly enjoyed this pattern! As always, if you make a pair for yourself we would LOVE to see them, send us pictures! And if you're looking for more of our crochet patterns, you can check those out on our crochet page here.
http://www.domesticblisssquared.com/201 ... ttern.html-----------------------------------------------------------------------------------------------------------------------------------